If you store photos on your home PC and don’t back them up, I really recommend you do. Hard drives fail all the time yet I still get many emails and PMs asking for help with data recovery. Even if you use an online backup solution, I still recommend taking an inexpensive local backup on optical media periodically.
I have my photos synced on two hard drives at home, on a remote server (RAID 10), and with a third-party storage provider. I’m still paranoid about losing my life’s memories in photos so I like to take a snapshot of my photo data every two years. By making a biannual backup, you’ll always have 3-5 viable sets of discs (they don’t last forever) with your important files—should you ever lose or overwrite them. Hopefully this guide is helpful and gives you something to do with the remaining 88 of the 100 DVDs you purchased on sale three years ago…
Note: The best application for this task is CDBurnerXP. It’s free and it does the job well every time. We first highlighted this well-known program in 2008 with our “Essential Freeware Programs” list and I use it when I make these backups and if I ever need to burn a DVD. If you’re installing this application for the first time, please make note of step 6 in the How to Install CDBurnerXP section below.
Download CDBurnerXP |
| Windows Guides’ Rating | Compatible with | System |
4 out of 5 |
How to Install CDBurnerXP
- Double click the installer and click Next
- Read and accept the agreement and click Next
- Click Next to install CDBurnerXP in the default location
- Uncheck Languages, click your native language (default is English), and click Next
- Click Next (adds a desktop icon)
- I recommend you do not accept the (Open Candy) freeware installation; I clicked I do not accept and clicked Install
- Click Finish to launch CDBurnerXP
Burn Data to Multiple Discs
To burn your data to multiple discs:
- Open CDBurnerXP and click OK to burn a new Data disc
- Locate your files in the navigation panels and drag them to the lower panels to add them to your compilation
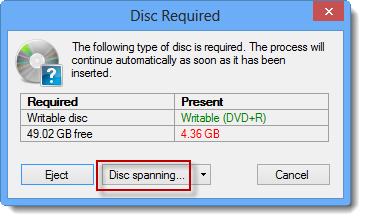
- Click the burn button
- Click Disc spanning…
- Select your disc type; for the burn method, I recommend you select Use as few discs as possible. Click Split
- Gather your discs and click Burn

- As this is your go to backup, I recommend you lower the burn speed to no more than 4x and select Verify Data. Once you’ve made your choices, click Burn disc
If you’re burning these discs to archive, I recommend you select Prevent further changes to the disc (finalize) under burn options
- Go get some fresh air and pop a disc in when you see the drive is open and waiting for another to burn
Verify Your Backup
A verified burn shouldn’t leave you with a corrupted disc but you might as well do this right and double check if you’re only making backups biannually or even less frequently. To verify your backup, I recommend you open a backed up file on each disc after the burn process is complete.
Restore from Backup
To restore from backup:
- Start with the first disc and copy the contents to your restore location
- When you put in the second disc and copy the contents, click Yes when Windows asks if you want to replace folders during the copy operation
- Repeat for all discs
Other Backup Options
While you’re making backups, you might also like:
- Automatically backup your data to another PC on your home network
- Check out some of the best free backup programs
- Tips for picking an online backup host
- Automatically make backups of files you’re working on
- Check out other great alternatives to CDBurnerXP: ImgBurn and Ashampoo Burning Studio
- Backup your DVD movies to master ISOs
About Rich
Rich is the owner and creator of Windows Guides; he spends his time breaking things on his PC so he can write how-to guides to fix them.
- Web
- |
- |
- |
- |
- Google+
- |
- More Posts (1019)


Search Windows Guides